A tube of liquid liner, a leftover eyeshadow palette from last Christmas, and twenty minutes before the bus — that’s usually the whole budget for a teen’s Halloween look. The good news is that’s plenty, because the best looks below skip fake blood capsules and prosthetic pieces entirely.
Some of these fit into a five-minute window before first period. Others ask for a full hour on the actual night of the party, once homework is out of the way and nobody’s waiting on the bathroom mirror. Both kinds are listed here, split by how much time and product they actually take.
Twenty-one looks follow, grouped from fastest to most involved, every one of them built from things already sitting in a normal makeup bag.
Quick Looks for a Regular School Day
These take five minutes or less and wash off with a regular face wipe before dinner. Nothing here needs face paint.
1. Two-Dot Cat Nose With Painted-On Whiskers
A small black triangle drawn just below the tip of the nose reads as a cat nose the second someone glances over, and three thin lines fanned out from each cheek finish the whiskers. Regular black eyeliner does both jobs — no separate face paint required.
The whole thing takes under two minutes once the lines are practiced once on the back of a hand, and it survives a full day of face-touching better than anything that needs blending. It also pairs with any dark-colored outfit already in the closet.

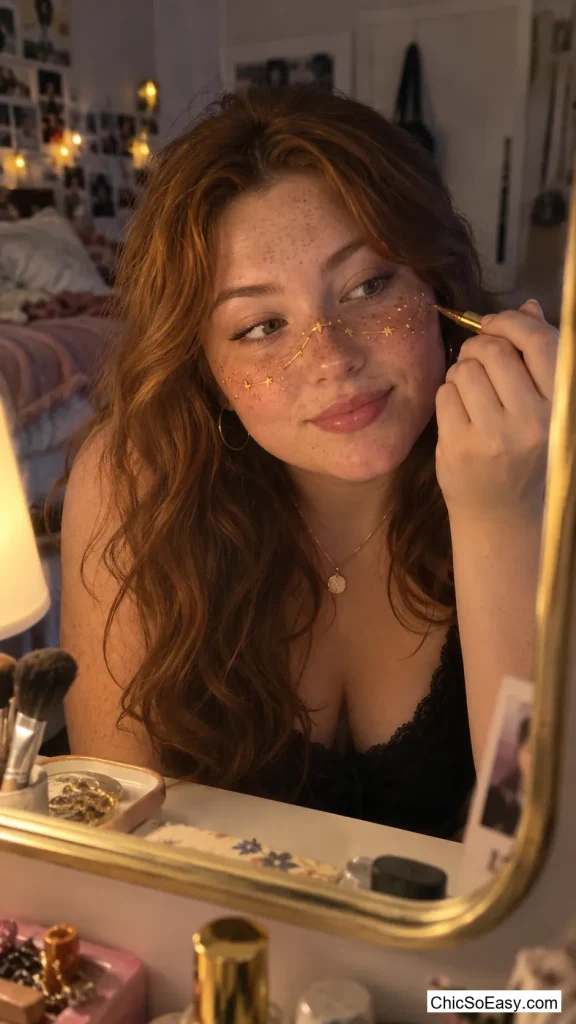
2. Freckled Constellation Face
Using a fine-tip white or gold eyeliner pencil, dot small “stars” across the cheeks and nose bridge in the rough shape of a real constellation — Orion’s belt is the easiest to fake since it’s just three dots in a line. A couple of thin connecting lines turn scattered dots into an actual pattern.
It reads as festive without reading as a full costume, which matters for a look that has to survive a school day next to a dress code. The gold pencil version also catches light in class photos in a way plain freckle dots don’t.
If the pencil smudges by lunch, a cotton swab dipped in makeup remover cleans up a single dot without needing to redo the whole face.
3. Single Gold Crack Down One Cheek
Instead of covering the whole face in a porcelain-doll pattern, one gold or silver liquid liner crack running from the corner of the eye down to the jaw does the job on its own. A touch of white eyeshadow blended just around the crack line gives it the illusion of chipped, pale skin.
The one-line version takes a fraction of the time a full doll face needs and looks deliberate rather than half-finished, which is the risk with a bigger design attempted in a rush. It also leaves the rest of the face free for normal foundation and blush.

4. Chalkboard-Style Ghost Doodles on the Cheeks
Pale foundation two shades lighter than usual sets the base, and then a white eyeliner pencil sketches a tiny doodle on each cheek — a ghost, a bat, a crescent moon — the way chalk sits on a blackboard. Keeping the doodles small and symmetrical is what sells the effect.
This one splits the difference between “in costume” and “just wearing makeup,” so it holds up in a classroom that doesn’t allow full costumes but is fine with a Halloween-themed look. Pale foundation alone, without the doodles, still works as a backup if a teacher asks for something more toned-down.

Eyeliner-Only, No Extra Products Needed
Everything in this group uses a single eyeliner pencil or pen and nothing else, for the mornings when there’s no time to dig through a whole makeup bag.
5. Barbed-Wire Eyeliner Wing
Instead of a smooth cat-eye flick, the winged line gets small angular points added along its length, so it reads as barbed wire wrapping toward the temple. A liquid or gel liner holds the sharp points better than a pencil, which tends to drag.
It takes about the same amount of time as a normal winged liner once the angle pattern is practiced twice, and it works on either eye alone for a subtler, one-sided version. Mirrored on both eyes, it becomes the whole look with zero other products.
Going slowly on the points matters more than speed here — a shaky barb reads as a mistake, while a clean one reads as intentional even if it’s not perfectly symmetrical.

6. Classic Spiderweb Corner
A small web drawn in the outer corner of one eye, radiating a few curved lines out from a center point, is one of the simplest Halloween liner looks to pull off and still reads instantly. Black liquid liner gives the cleanest lines, though a sharpened black pencil works nearly as well.
Because it only covers one small corner, it’s forgiving of shaky hands in a way a full face design isn’t — a slightly uneven web still looks like a web. It’s also easy to size down for a subtler version or up for something more dramatic depending on the day.

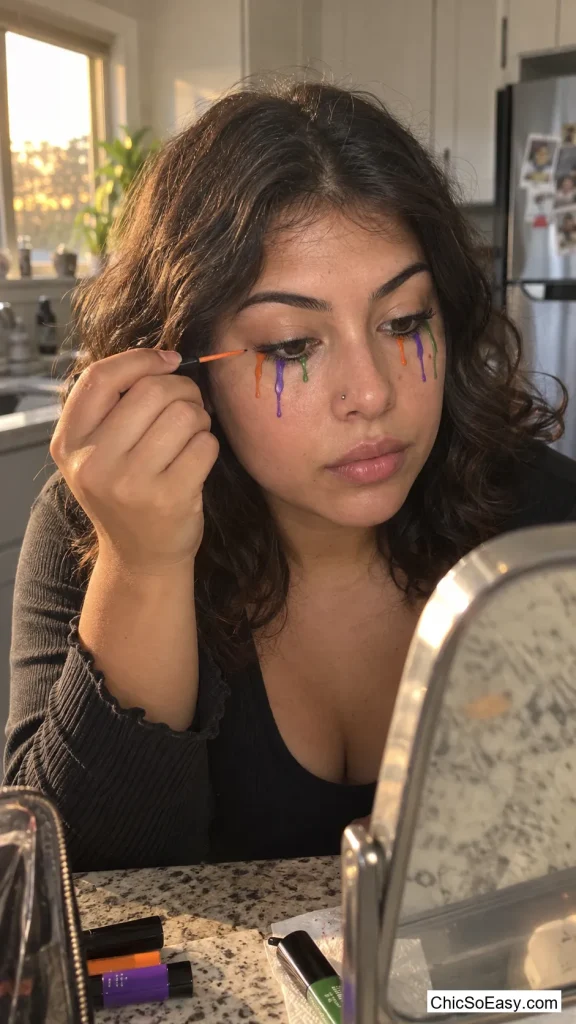
7. Melted Crayon Eyeliner Drips
Several thin vertical lines in different bright liner colors — orange, purple, green — drawn dripping down from the lower lash line mimic melted wax running down a candle. Keeping the lines slightly uneven in length sells the “melting” part better than perfectly even drips do.
This one skips black and red entirely, which makes it a good fit for anyone who wants a Halloween-coded look without going toward blood or gore. Colored liners that are already sitting unused in a makeup bag get a reason to come out.
A slightly damp cotton swab can soften and blend the very tips of each drip if the line looks too crisp and cartoonish rather than melted.
8. Stitched Corner-of-the-Mouth Lines
Small black X marks drawn in a short row from the corner of the mouth toward the cheek mimic stitched-up lips without covering the whole face in white the way a full doll or Frankenstein look would. A fine-tip liner pen gives the cleanest small X shapes.
Because it’s contained to one small area, this survives eating and talking through a school day better than anything drawn across the whole mouth. It also layers cleanly on top of regular lipstick or gloss underneath.

Classic Characters, Reworked
The four most-requested Halloween makeup characters, each with one specific change that makes it look less like a costume-shop version and more like something put together at home.
9. Vampire With a Bronzy Lip Instead of Classic Red
The usual pale base, dark smoky eye, and a small trickle of fake blood at the corner of the mouth all stay, but swapping the traditional bright red lip for a warm bronze or berry shade keeps the whole look from tipping into theatrical territory. A cream contour along the cheekbones, one shade darker than the base, adds the hollow look without needing separate face paint.
The bronze lip reads as wearable rather than costume-store, which matters for anyone planning to keep the makeup on past the Halloween event itself. It also photographs better under indoor lighting than bright red tends to.
If fake blood isn’t on hand, a small dot of dark red or maroon lipstick applied with a fingertip does the same job at the corner of the mouth.

10. Soft Pink-and-Gray Zombie
Instead of the usual green-gray base, a cooler gray-lavender foundation mixed with the regular skin-tone shade keeps the undead look without turning the whole face one flat color. Dusty pink blush placed slightly too high on the cheekbones, plus smudged gray-purple eyeshadow underneath the eyes, does the rest.
This version reads as “unwell” rather than “monster,” which fits anyone who wants to lean into the theme without a full green or gray face. It also blends more easily back into normal makeup the next morning, since the base colors are close to natural skin tones.

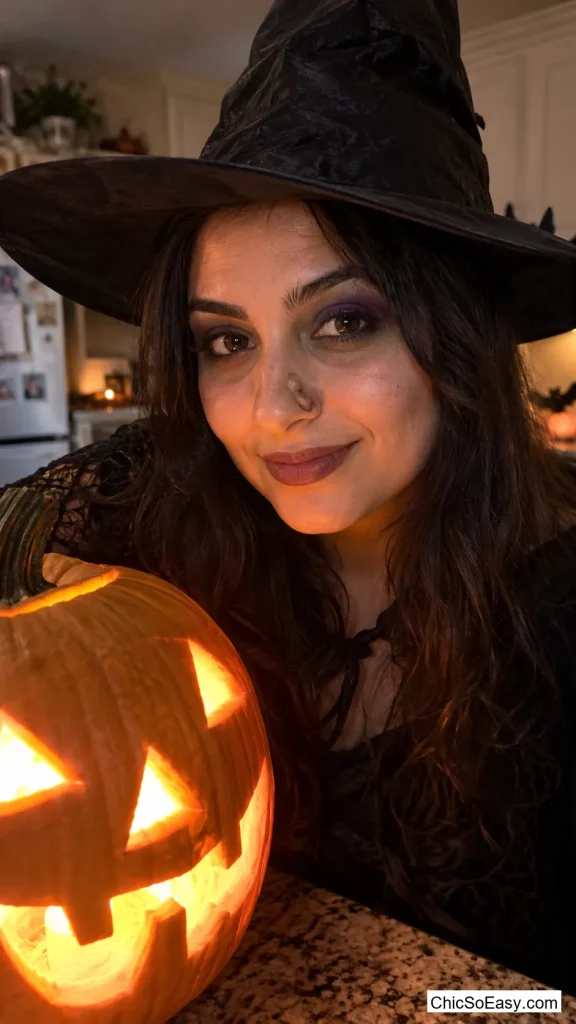
11. Witch With One Warted Freckle Instead of a Full Green Face
Rather than covering the whole face in green, a single small raised “wart” — built with a dot of clear brow gel or a tiny bit of scar wax pressed into a point, then shaded with brown eyeshadow — sits on the side of the nose. Deep purple-green eyeshadow in the crease and a slightly darkened lip carry the rest of the theme.
One wart instead of a full green face avoids the transfer problem that comes with wearing thick colored face paint around light-colored clothing all day. It also takes a fraction of the time a full green base needs to apply and remove.
If scar wax isn’t available, a tiny ball of tissue held in place with brow gel builds a similar raised texture in a pinch.
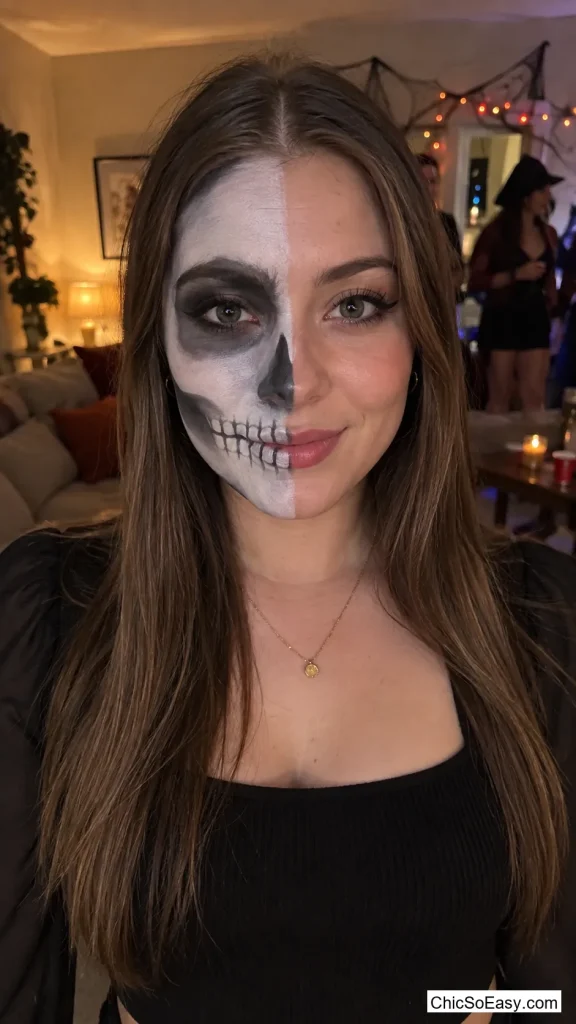
12. Skeleton Half-Face, Blended Into Normal Makeup on the Other Side
One half of the face gets the classic white-and-black bone shading — a hollowed cheek, half a nose bridge, a section of jaw bone — while the other half stays in whatever makeup was already planned for the day. A straight center part in the hair helps sell the split down the middle.
The half-and-half format cuts the application time roughly in half compared to a full skeleton face, since only one side needs the white base and precise bone lines. It also leaves the option to turn toward the “normal” side of the face in situations where the full skeleton look isn’t ideal.
A thin strip of white eyeshadow blended right along the center line, rather than a hard edge, keeps the transition looking like a design choice instead of a mistake.
Cute Over Creepy
For anyone who wants the holiday spirit without leaning into blood, bruises, or anything undead.
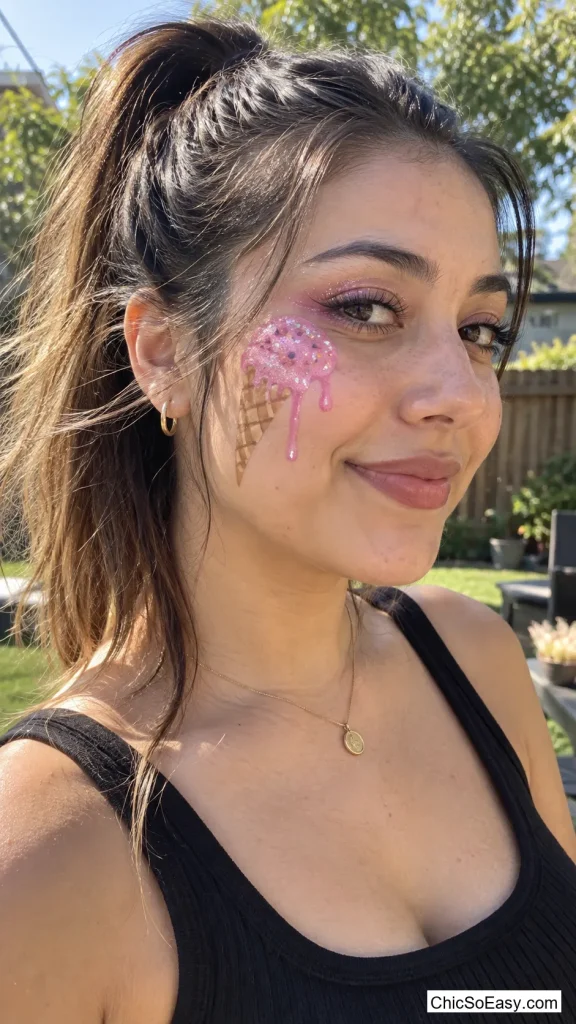
13. Melting Ice Cream Cone Cheek Art
A small triangle drawn in tan or brown eyeliner on one cheek forms the cone, with a swirl of pink or white eyeshadow “scoop” on top, plus a few thin drip lines trailing down toward the jaw. A dusting of loose glitter on the scoop gives it a sprinkle effect.
It’s one of the few looks on this list that has nothing to do with anything scary, which makes it an easy pick for anyone who wants a Halloween-adjacent look for a daytime event rather than a nighttime one. The colors also work with pastel or bright outfits in a way most of the darker looks on this list don’t.
14. Butterfly Wing Eyeshadow Framing One Eye
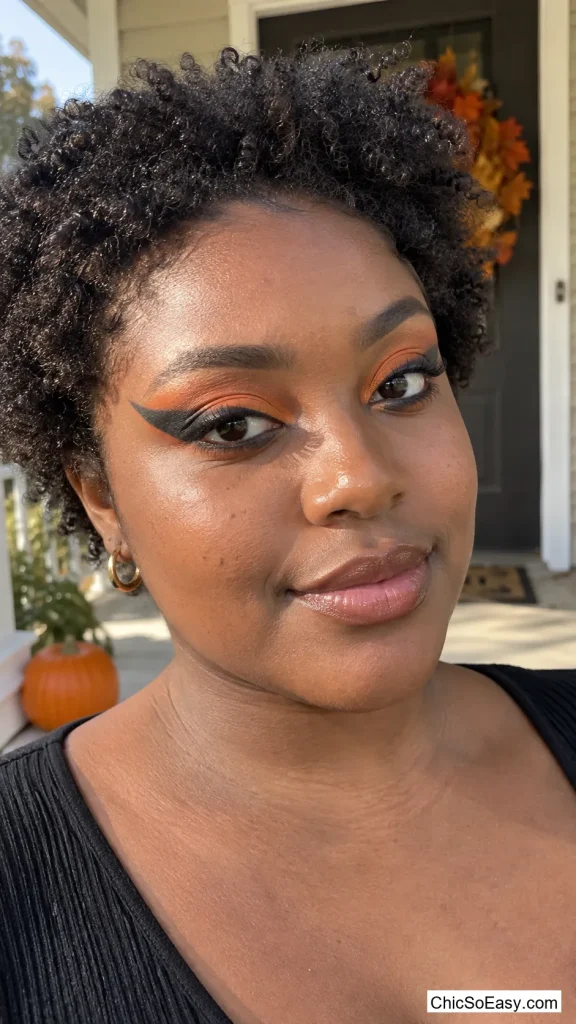
Bold eyeshadow — orange and black for a monarch, or purple and blue for something less literal — gets shaped into a wing extending out from the outer corner of one eye, following the natural line of the brow bone. A thin black liner traces the wing’s edge to keep the shape crisp.
This one leans decorative rather than spooky, so it fits a Halloween party that’s more about dressing up than about horror. Because only one eye is involved, the other eye can stay in whatever everyday makeup was already planned.
15. Video Game Health Bar Across the Forehead
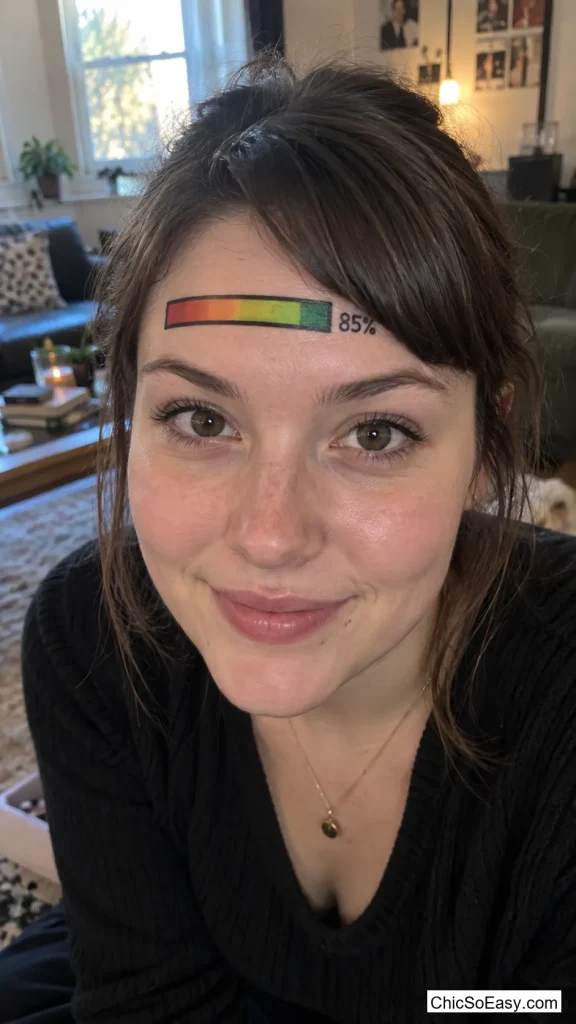
A thin red-to-green gradient bar, outlined in black and divided into a few small segments, drawn across the forehead mimics the health meter from a video game HUD. A tiny black number or fraction just beside it adds to the effect.
It’s an easy way to reference a game or character without needing to replicate an entire face design, and it works well paired with an otherwise plain outfit since the forehead does all the talking. It also tends to get more specific recognition from friends who play the same games than a generic costume would.
Worth the Extra Hour, for the Actual Party
These take more time and a steadier hand, which makes them a better fit for the night of the party than for a rushed morning.
16. TV Static Eye
Small irregular blocks of gray, white, and black eyeshadow packed closely together across the lid and slightly past the outer corner mimic the visual noise of a screen with no signal. A thin strip of silver or white liner along the very edge of the lid, drawn slightly jagged rather than straight, reads as the screen’s border.
The blocky, uneven texture is the whole point, so this is one of the few looks on this list where imperfect blending actually helps rather than hurts. It photographs especially well under flash, since the contrast between the light and dark blocks shows up clearly.
Building the blocks with a flat synthetic brush rather than a blending brush keeps the edges sharp enough to read as “static” instead of turning into a regular smoky eye.

17. Paper-Cut Confetti Cheeks
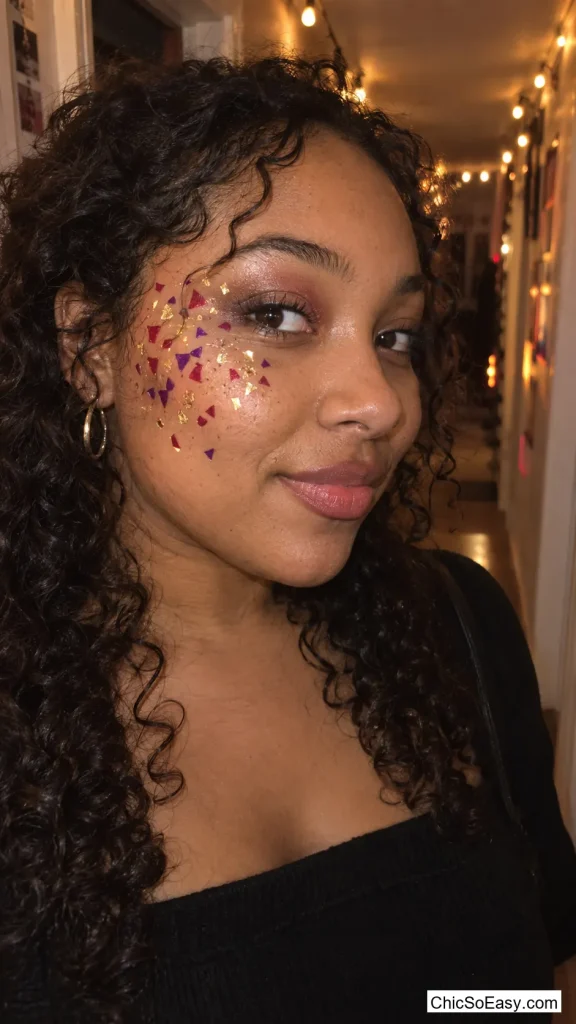
Tiny irregular shapes of colored eyeshadow — applied with the edge of a small angled brush rather than a full sweep — get scattered across one cheek in reds, purples, and golds, mimicking shredded confetti paper. A dot of clear brow gel over each shape keeps them from smudging into each other.
Because the shapes are small and scattered rather than one continuous design, minor unevenness between individual pieces doesn’t read as a mistake the way it would in a symmetrical design. It also uses whatever leftover eyeshadow colors are sitting at the bottom of a palette that don’t usually get worn together.
18. X-Ray Skeleton Hand Cupping the Jaw
A hand-shaped bone design — drawn with white eyeliner or face paint directly on the jaw and lower cheek, fingers curling up toward the ear as though a skeleton hand is resting there — replaces the usual full-face skeleton look with one striking detail. Gray shading along each “bone” gives it dimension instead of flat white lines.
Because the design sits along the jawline rather than across the whole face, foundation and normal eye makeup stay untouched, which cuts prep time compared to a full skeleton face. It also reads clearly in photos taken from the side, which most Halloween makeup doesn’t account for.
Practicing the finger placement on the back of a hand first helps avoid fingers that look too short or too widely spaced once transferred to the jaw.

For the Sleepover or Late-Night Hang
Once the lights go low and a string of blacklight bulbs comes out, these are the three worth the extra product.
19. UV Glow-Stick Freckles
UV-reactive face paint or a UV-reactive eyeliner pencil, applied in small dots across the nose and cheeks the way real freckles sit, disappears in normal light and lights up under a blacklight. A few slightly larger dots mixed in with the small ones keep the pattern from looking too uniform.
This is one of the only looks on the list that changes completely depending on the room, which makes it a good fit for a party that moves between regular lighting and blacklight sections. It also layers right over regular makeup without needing to redo a base first.

20. Single Sequin Tear Track
Instead of covering the whole face in loose glitter, a single line of small flat sequins glued down the center of one cheek with lash glue mimics a glittering tear track running from the eye. Silver or iridescent sequins catch the most light under a phone flash.
One line takes a fraction of the product and cleanup that a full glitter face needs, and it survives a night of moving around far better than loose glitter does. The lash glue holds through several hours without needing touch-ups.

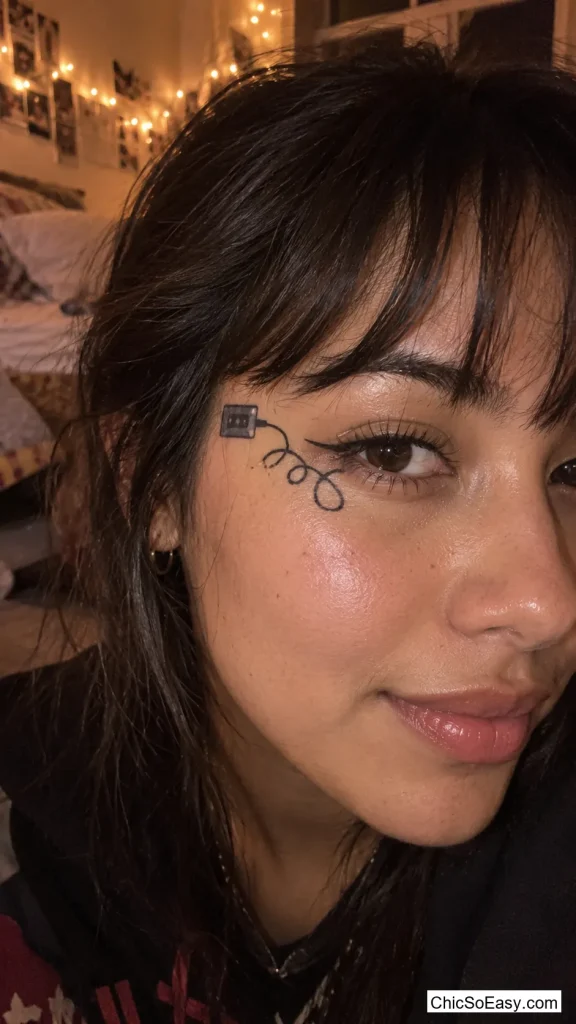
21. Cassette-Tape Ribbon Wrapped Around One Eye
A thin black liner line, drawn in loose loops and curves out from the corner of one eye, mimics a tangled ribbon of cassette tape spilling loose from its reel. A small rectangle shaded in gray near the temple stands in for the cassette shell itself.
The loose, looping lines are meant to look a little imperfect, which makes this a forgiving option for a hand that isn’t confident with sharp, precise shapes. It also works well as a one-eye accent paired with any of the other looks on this list that only need one full eye.
Final Thoughts
None of these looks needs a special-effects kit or a trip to a costume store — every product used above is something that shows up in a regular makeup bag or a drugstore aisle already. Starting with a five-minute option from the first section is the easiest way to find out how much time and product actually feels worth it before committing to one of the bigger looks for the actual night of the party.